DIY Eid Cards Part 2
Asalamualykum people!
Today I will be sharing a DIY with you.
So, without further a due, here is a DIY you can gift to your friends and family.
Materials:
- scissors
- Glitter (any colour)
- Glue
- Pen/Pencil
- Permanent Marker (not photographed)
- Bristol Board (as big or as small as you want)
- Ruler
- Paintbrushes
First, start by folding your bristol board in half. You can fold it horizontally or vertically it's your choice as to how you want your card to look.
Next, using the edge of your scissors drag it along the folded edge of your bristol board to insure that your card will have a nice fold without any creases.
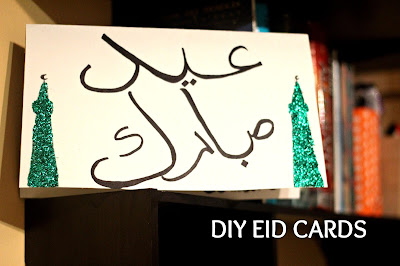
Since it is Eid, I thought it would be a great idea to draw minarets on either side of the card. I just roughly sketched one on my board.
If you don't know what a minaret looks like or how to draw one, you can google some images of it for inspiration.
After you've finished that, it's time to spread some glue onto your minarets. Start by applying a line of glue down the middle of the minaret. Then, using your paintbrush spread the glue so that it covers the entire width of the minaret you've drawn.
Quickly before the glue dries sprinkle your glitter over the entire width of the minaret. You don't have to worry about the glitter falling in the exact shape of the minaret. We will fix that later.
What you are going for when you are sprinkling the glitter is a fat rectangular-ish shape like this.
Lift the card so that it is standing upright and shake the glitter off.
Repeat the process for the other side. If there are any bald spots where the glitter didn't stick, reapply some glue on that spot and repeat the glittering process.
It's time to write 'Eid Mubarak' on the card. I chose to write it in Arabic, but if you don't know how to do that then you can just opt to writing it in English.
I first wrote it in pencil to get an idea of how it will look. Then when I was satisfied, I went over it with permanent marker.
Congratulations you have finished the front cover of your card!
Now for the inner portion.
One thing I should add is that before you print out the text make sure it is big or small enough to fit your card. Mine fit my card perfectly. Alhamdulillah!
Cut the text out in a square shape.
Apply glue to the back side of the paper. Repeat the same gluing process as before.
Flip the card over. Centre it on your paper and pat it down. There may or may not be creases on your card depending on how well you placed the paper onto the card.
In my opinion I don't think it really matters if there are creases since this is a DIY, it's not meant to be perfect.
If you're one of those people who like everything to be perfect then you can either be very careful when placing the paper or you can switch out the glue and use double sided tape and adhere the paper onto the card that way.
Lastly, write 'ameen' with your permanent marker on the bottom right side of the card. I added a little heart too but that's just an optional step :)
And there you have it! You're very own DIY Eid Card!
Good job you guys!
See you in the next one.
Peace,
L.


Comments
Post a Comment